WordPress is a renowned platform with millions of users worldwide. With a huge volume of customer base and features, it is proved to be one of the best platforms for improving business of any sizes. A best and beneficial factor about WordPress (WP) is its easy-to-use features and functionality. So, it is well known that raising an online website using the WP site would be beneficial for your online business. However, you could still make more money from the WP sites with ease by adding simple photo galleries to the site. In order to achieve that you require nothing, except the photos to be uploaded. Generally, most platforms require the assistance of plugins to add photos to the websites. On the contrary, WordPress is powered with options of adding photo gallery to the sites without the assistance of any additional modules too. But, remember if you plan to add multiple photos, create varieties of colorful albums and manage them, obviously you have to go for the plugins. But, creating a simple photo gallery is quite easy without plugins. So, you can set up a photo gallery in your WP site absolutely free-of-cost in no time using the default functions of WordPress.

Why photo gallery and how it influences online business?
Before setting your hands up on adding photo galleries to the site, it is vital to learn why you need a photo gallery to your site. Given the current trend and technology, designing a site with attractive features is a must. Well, compared to different options to make the website look attractive, adding photos and creating gallery would be a great option as it helps a lot in improving conversion rates and revenues. Websites without pictures and videos are hardly noticed in today’s world. People always strive for visual elements as they fascinate them like anything. So, it is quite evident that adding a photo gallery with splendid options is going to improve the standards of your business to a huge extent. With said that, add an exciting album of photo gallery to your website and amuse most customers with ease. A quick and easy to set up photo gallery would multiply the chances of your business getting profited with ease. In fact, there are plenty of plugins available for this purpose as well, while some are free, a few cost some pennies. If you want to create a simple photo gallery, you don’t have to opt for the plugins as there are methods to add photos and create gallery without their help. Make use of the WordPress in-built functionality to improve the performance of your site.
How to create a photo gallery?
The step-by-step approach to create photo gallery below would help anyone who love to set up one such in your WP website.
Best Clean WordPress Themes 2017Step 1: Login to the WP account.
Step 2: Click the “Post” on the Dashboard page.
Step 3: Click “Create New” below the “All Posts” option.
Swiveling From Novice to Pro-Basic HTML to WordPress ConversionStep 4: On clicking the “Create New” option, a blank page open up.
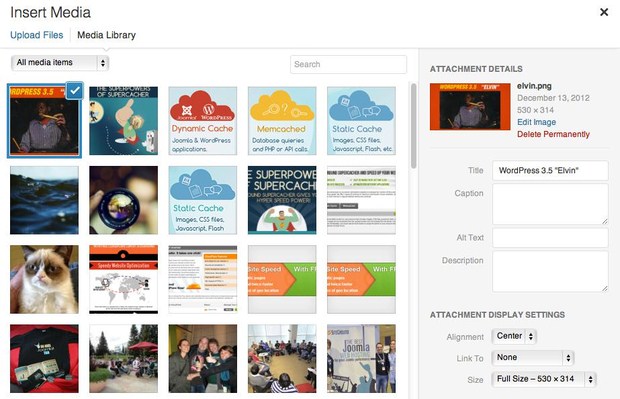
Step 5: You could see the option “Upload/Insert” above the “Description” box in the very same page.
Step 6: Click the “Upload/Insert” option.
Free Template Ecommerce with Responsive DesignStep 7: Select Create Gallery & load your favorite images to the website from your local system.
Step 8: Add as many photos you want to. All the images added to the website will be moved to Gallery option on the top of the page where you uploaded the image.
Step 9: Once the images are uploaded, you could view the images with their properties next to them.
Useful WordPress Plugins You Should Have [2017 Collection]Step 10: Organize the images the way you want. All you have to do is just drag and drop the necessary pictures.
Step 11: Modify the properties like Title, Description, Caption, etc. to make the images look aggressive online.
Step 12: Select how you want to display your images online. The options for selecting the number of columns will be provided at the bottom before “Update Gallery Settings.”
Step 13: Hit the “Update Gallery Settings” to insert your photo gallery to the WP site.
Looks amazingly simple right! Well, you are done with adding photo gallery to the WP site. Now add necessary content to the post and click Preview option to check the visual image added using the above technique. Finally, click “Publish” to make your blog or article live and searchable by many customers worldwide.
You don’t have to put in any additional efforts to create a photo gallery and you now know how simple it was to create such an interesting and outstanding photo gallery. Most users nowadays prefer photo galleries in order to improve customer movements and maximize profits. By presenting your entire products and services in the form of photos, you could easily persuade customers. Customers impressed by the images would obviously go for the purchase.
Well, adding photo galleries to the sites has almost become a trend for most business owners. So, including a smart array of photo galleries to the websites is never going to affect your business on any cost. In fact, it improves the sales.
I hope everyone enjoyed this article and the information provided is useful to many. Kick start your online business now and add product-related photos to the website to make it more interesting for visitors to complete a purchase without any hassles and bustles.