Have you ever wanted to draw something that defies gravity or twists reality? Optical illusions aren’t magic—they are a mastery of perspective and shading. Whether you are using a traditional graphite pencil or the latest 2026 digital stylus, this guide breaks down the most popular mind-bending drawings into simple steps.
Creating art that tricks the brain is a skill that blends mathematics with creativity. In this comprehensive guide, we provide step by step instructions for optical illusion drawings that range from beginner-friendly patterns to complex anamorphic masterpieces. By the end of this article, you will understand exactly how to manipulate lines, shadows, and perspective to create visual paradox sketches that will leave viewers questioning their own eyes.
The Toolkit: Materials for Analog and Digital Illusionists
Before we put pencil to paper, gathering the right tools is essential for precision. Optical illusions rely heavily on clean lines and exact geometry; therefore, using sub-par equipment can ruin the effect before you even finish the outline. For the traditional artist, precision is paramount. However, for the digital artist in 2026, software assistance has changed the game entirely.
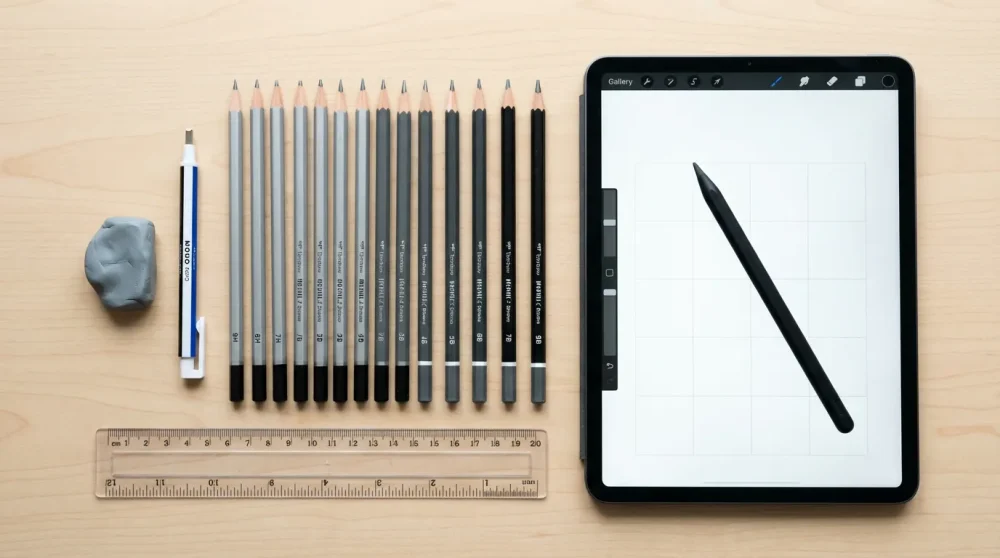
Essential Traditional Tools: Rulers, protractors, and graphite grades
If you are drawing on paper, a reliable straight edge is non-negotiable. You cannot freehand an impossible shape and expect the perspective to hold up. Consequently, a clear plastic ruler and a protractor are vital for measuring the critical angles found in isometric drawing grids. For example, the Penrose triangle relies on strict 60-degree angles to maintain its impossible loop.
In addition to measuring tools, your choice of graphite matters significantly. You will need a range of pencils: use harder grades like 2H or 4H for your initial construction lines, as these need to be erased cleanly later. Conversely, for the final shading that creates depth, soft pencils ranging from 4B to 8B are necessary to achieve the deep blacks required for shading techniques for depth.
How to Open and Convert HEIC Files from iPhone: Simple Solutions for EveryonePaper Selection: Why smooth Bristol board matters for blending
Standard printer paper is often too thin and porous for high-quality illusion art. Because optical illusions frequently require smooth gradients to sell the 3D effect, rough paper grain can break the illusion by revealing the texture of the surface. Thus, smooth Bristol board is the industry standard for these drawings.
Bristol board allows your graphite or ink to sit on the surface, making blending much easier. When you are trying to create a digital illusion art look on paper, that smoothness is key. Furthermore, the thickness of Bristol board stands up well to heavy erasing, which is inevitable when you are learning how to draw impossible objects instructions.
Digital Tools in 2026: Procreate 7 features for grid snapping
For those working digitally, the landscape has evolved. In 2026, apps like Procreate 7 have introduced ‘Smart Perspective Snapping’ which automatically corrects your lines to fit a pre-set anamorphic grid. This is a massive time-saver compared to manual plotting. A digital art optical illusion tutorial procreate workflow now allows you to drag and drop vanishing points and have the brush engine align every stroke perfectly.
Learn How to MLA Format Your Essays for Maximum ImpactMoreover, modern styluses now offer haptic feedback that simulates the friction of paper, giving you the control of analog with the undo button of digital. This hybrid approach is perfect for beginners who want to attempt trompe l’oeil techniques without the fear of making permanent mistakes.
Erasers: Kneaded erasers for highlights and mono-zero erasers for edges
An eraser is not just for correcting mistakes; in illusion art, it is a drawing tool. A kneaded eraser is essential for lifting graphite gently to create soft highlights on curved surfaces, such as the bend of an impossible pipe. It allows you to model the light rather than just removing darkness.
On the other hand, a Mono-zero eraser (a tiny, pen-like eraser) is crucial for cleaning up edges. Sharp, crisp edges are what define impossible shapes step by step. If the edge of your drawing is fuzzy, the brain stops perceiving it as a solid 3D object and sees it merely as a smudge on paper.
The role of lighting in your workspace for reference checks
Finally, do not underestimate your physical environment. When drawing anamorphic art tutorial pieces, you often need to photograph them from a specific angle to see if the illusion works. Having a movable desk lamp helps you simulate the light source you are trying to render.
For instance, if you are drawing a cast shadow to the left, positioning your physical light to the right of your paper can help you visualize how the shadow should fall. This real-world reference check is vital for grounding your drawing tricks 2026 in reality.
Understanding the Science: How Visual Deception Works

To truly master illusions, you must understand the ‘why’ behind the ‘how’. Optical illusions exploit the shortcuts our brains take when processing visual information. By understanding these cognitive gaps, you can manipulate lines and shapes to force the viewer’s brain into seeing depth where there is none.
The psychology of perception: Gestalt principles
Gestalt psychology suggests that the human brain tends to organize visual elements into groups or unified wholes. When we look at a drawing, our brain desperately wants to make sense of it. It will fill in gaps or connect disconnected lines to form a familiar shape. This is the foundation of many simple line illusions step by step.
For example, if you draw three ‘Pac-Man’ shapes facing each other, the brain perceives a white triangle in the negative space between them. This is the principle of ‘Closure’. As an artist, you can use this to imply edges without actually drawing them, creating a ghostly, floating effect often seen in visual perception art.
Linear Perspective: 1-point, 2-point, and 3-point basics
Perspective is the mathematical engine of 3D drawing. One-point perspective involves all lines converging to a single point on the horizon, which is perfect for drawing roads or tunnels. However, most optical illusions utilize isometric perspective (no vanishing point) or extreme 2-point perspective to create distortion.
Vanishing point perspective is what gives an object volume. In an impossible triangle, the artist manipulates these perspective rules—using isometric angles that imply 3D depth locally but fail to connect logically globally. Mastering this contradiction is key to drawing MC Escher style art.
Light and Shadow: The engine of depth
Without shading, an optical illusion is just a collection of lines. Light and shadow tell the brain where an object sits in space. Shadows anchor an object; if you draw a shadow slightly detached from the object, the object appears to float. This is a fundamental technique for a floating cube drawing.
Furthermore, gradients create curvature. A flat rectangle becomes a cylinder simply by darkening the edges and leaving a highlight in the center. Understanding ambient occlusion—the darkest shadows where objects touch surfaces—is critical for realism in shading techniques for depth.
Anamorphosis explained: Distorting for a specific viewing angle
Anamorphosis is the art of distorted projection. This technique requires the viewer to look at the drawing from a specific vantage point (usually a steep angle) to see the ‘correct’ image. From the top down, the drawing looks like a stretched, elongated mess. But from the designated angle, it pops up as a 3D object.
To achieve this, artists often use a grid method. By stretching the grid vertically, you stretch the image. When viewed from a low angle, the foreshortening compresses the image back to normal proportions. This is the secret behind those viral how to draw a 3d hole in paper easy step by step videos.
Forced Perspective: Tricks used in photography and drawing
Forced perspective creates an optical illusion that makes objects appear larger, smaller, closer, or farther away than they actually are. In drawing, this often involves manipulating the size of objects relative to the horizon line. A small object drawn near the horizon looks giant and far away, while a large object looks close.
In 2026, we see this technique combined with photography. Artists draw a scene where a real-life object (like a pencil or a hand) interacts with the drawing. For instance, drawing a character holding up the actual pencil you placed on the paper. This integration of reality and sketch creates a powerful visual paradox sketch.
Tutorial 1: The Impossible Triangle (Penrose Triangle)
The Penrose Triangle is the quintessential impossible object. It appears to be a solid object made of three straight beams of square cross-section which meet pairwise at right angles at the vertices of the triangle they form. Here is how to construct it.
Step 1: Establishing the equilateral triangle base
Start by drawing a simple equilateral triangle. This will serve as the outer skeleton of your shape. Use your ruler to ensure all three sides are exactly the same length. This symmetry is crucial because any deviation will make the final illusion look lopsided rather than impossible.
Keep these lines very faint (using your hard H pencil) because they are merely guides. You will be erasing parts of them later. This basic shape defines the overall size of your penrose triangle drawing.
Step 2: Drawing the internal parallel lines
Next, you need to create the thickness of the beams. Inside your main triangle, draw a smaller triangle, keeping the distance from the outer lines consistent. Then, draw a third, even smaller triangle inside that one. You should now have three concentric triangles.
It is vital that the spacing between the lines remains uniform. If one beam looks thicker than the others, the brain will interpret it as a mistake rather than an illusion. This step sets up the ‘ribbons’ that will eventually fold over each other.
Step 3: Cutting the corners to create the overlap
This is where the magic happens. You need to connect the lines in a specific way to create the twist. At each corner, extend the lines to form a ‘V’ shape that connects the outer triangle to the inner triangle. You must determine which arm of the triangle passes ‘in front’ of the other.
Follow a clockwise pattern: ensure the top beam overlaps the right beam, the right beam overlaps the left beam, and the left beam overlaps the top beam. This cyclical overlapping is what creates the impossibility. Referencing a completed impossible shapes step by step image while you do this is highly recommended.
Step 4: Erasing the guide lines
Once your corners are defined, take your eraser and remove the lines that would be ‘hidden’ if the beams were solid. Also, erase the original points of the outer triangle, as the corners are now flattened or L-shaped.
Clean up the interior. You should now have a clean line drawing of the Penrose triangle. At this stage, it will look flat, like a logo. The 3D effect only comes with the next step.
Step 5: Shading for the ‘impossible’ 3D effect
Determine a light source (e.g., top left). You will have three distinct surfaces for each beam: a top, a side, and an inner side. Pick one type of face (e.g., the top surfaces) and leave them white or very light.</p
Shade the second set of faces (e.g., the right-facing sides) with a medium grey. Finally, shade the third set (bottom or left-facing) with a dark charcoal tone. This high contrast shading creates the volume. Suddenly, your 2D drawing pops as a solid, yet impossible, 3D structure.
Common mistakes when connecting the corners
The most common error beginners make is inconsistent beam width. If the width varies, the corners won’t align mathematically. Another issue is confusion during the overlap phase—drawing a line ‘through’ a beam that should be solid.
To avoid this, draw the overlapping lines firmly before erasing the under-lines. Remember, this is one of the classic easy optical illusions to draw for kids and beginners, so don’t get discouraged if it takes two tries to get the overlaps right.
Tutorial 2: The ‘Hole in the Paper’ (Anamorphic 3D)
This is the crowd-pleaser—a drawing that looks like a gaping hole in your desk. It relies heavily on anamorphosis, or distorted perspective.
Concept: Distorting the grid
The secret to this illusion is that the image must be stretched vertically. Imagine a circle on the floor. If you look at it from standing height, it looks like an oval (ellipse). Therefore, to draw a circle that looks round from an angle, you must draw an ellipse on the paper.
We will use a grid to help guide this distortion. By elongating the grid squares along the vertical axis, we automatically elongate anything we draw inside them, creating the perfect anamorphic art tutorial setup.
Step 1: Drawing a square grid on the paper
Lightly draw a grid of squares on your paper (e.g., 5cm x 5cm). However, to aid the illusion, you can draw the vertical lines parallel, but make the horizontal lines get progressively further apart as they go ‘down’ the paper. This creates a forced perspective grid.
Alternatively, draw a standard square grid and prepare to elongate your drawing manually. For beginners, a standard grid is easier to manage. Ensure your lines are light enough to be erased later.
Step 2: Sketching the ‘hole’ shape (ellipse)
Draw a random, jagged shape or a simple oval that represents the opening of the hole. Because we want this to look correct from an angle, draw the shape slightly narrower and longer than you think it needs to be.
This shape is the ‘mouth’ of the hole. Everything inside this shape will be shaded darkly; everything outside remains the white of the paper. This high contrast boundary is essential for the trompe l’oeil techniques to work.
Step 3: Drawing vertical descent lines inside the hole
From the edges of your hole shape, draw straight lines going vertically down. These lines represent the walls of the pit. They should be perfectly vertical and parallel to the sides of your paper.
The length of these lines determines the ‘depth’ of the hole. Longer lines make a deeper pit. Stop them at an arbitrary point to form the ‘floor’ of the hole.
Step 4: Adding the ladder or stairs (optional complexity)
To really sell the effect, add a ladder. Draw the side rails of the ladder going down into the pit. Here is the trick: the rungs of the ladder should get closer together as they go deeper into the hole. This change in spacing mimics perspective foreshortening.
This creates a 3D ladder optical illusion. If you are feeling adventurous, you can draw a checkerboard floor at the bottom, but a ladder is the most effective cue for depth.
Step 5: Shading the interior depth (darkest at bottom)
Shading is critical here. The walls of the hole should be a gradient. Start with a medium grey at the top (near the surface) and fade into pitch black at the bottom. This simulates light struggling to reach the bottom of the pit.
The floor of the hole should be very dark. Use your 6B or 8B pencil here. The darker the hole, the brighter the paper surface looks in comparison, enhancing the illusion.
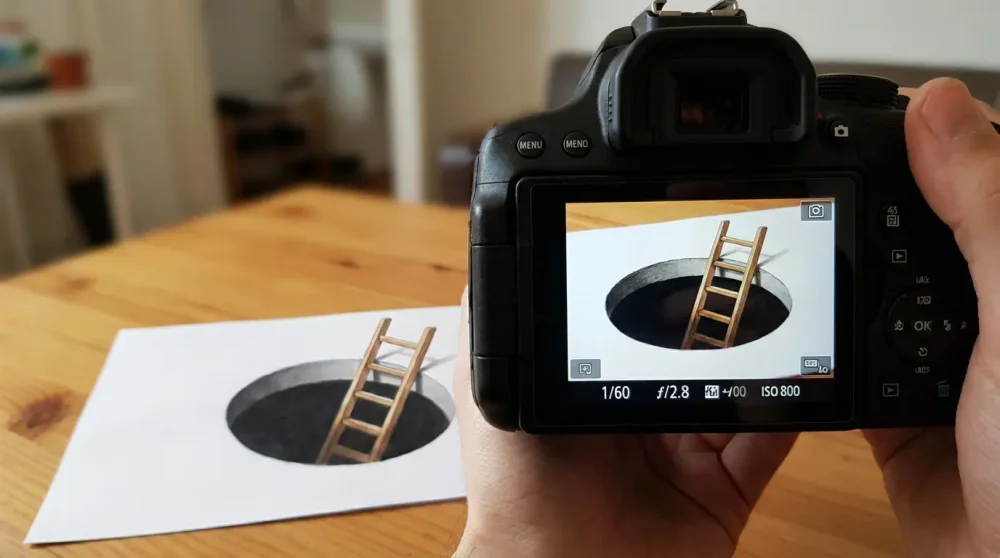
Step 6: Cutting the paper edge to sell the illusion
This is the physical trick. Once the drawing is done, take scissors and cut off the top half of the paper, following the top edge of your drawing carefully. Leave the drawing of the hole intact.
By removing the surrounding white paper, the drawing loses its frame of reference. When placed on a table matching the table in the drawing (or just a neutral surface), it looks like the hole is actually cut into the table. This is a favorite technique in drawing tricks 2026.
Photographing the artwork: Finding the sweet spot angle
Place your paper on a table. Close one eye or use your phone camera. Move your camera lower and lower until the elongated drawing suddenly compresses into a perfect circle or deep hole.
Once you find that ‘sweet spot’, snap the photo. This is the only angle where the illusion works perfectly. Share this how to draw a 3d hole in paper easy step by step result on social media for maximum impact.
Tutorial 3: Op Art Vibrating Patterns (Bridget Riley Style)
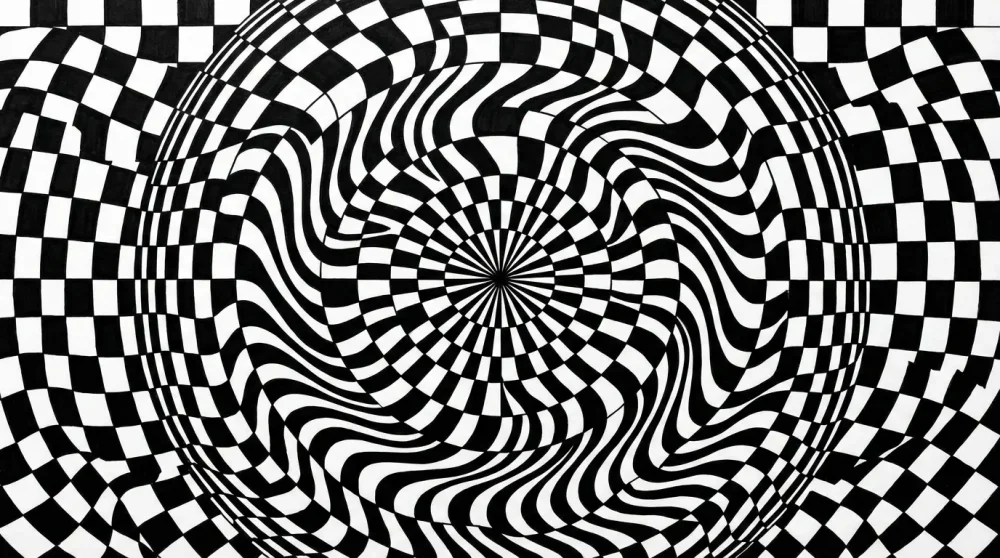
Op Art (Optical Art) uses patterns to create the sensation of movement or vibration. Inspired by artists like Bridget Riley, these drawings rely on high contrast and precise geometry.
Step 1: Creating a wavy grid structure
Begin by drawing a series of vertical wavy lines across your paper. The waves should be gentle and parallel to each other. Keep the spacing consistent initially.
Next, draw horizontal wavy lines that intersect the vertical ones. This creates a net of distorted squares. The curvature of these lines is what will eventually create the ‘bulge’ or rolling effect typical of op art patterns for beginners.
Step 2: Alternating black and white checkerboard flow
The engine of Op Art is the checkerboard. You need to fill in the grid squares in an alternating black and white pattern. Start at the top left and fill every other square.
Be extremely careful not to fill two adjacent squares. If you make a mistake here, the pattern breaks. This repetitive filling is meditative but requires focus. The result is a checkered optical illusion foundation.
Step 3: Compressing lines to create ‘movement’
To make the image look like it is bulging or sinking, you must vary the size of the squares. In the center of the paper, draw the grid lines closer together (compression). Towards the edges, space them out (expansion).
When you fill in the checkerboard, the compressed areas will look like they are receding or pinching, while the expanded areas will look like they are zooming towards the viewer. This manipulation creates a lines and distortion art effect.
Step 4: Inking precision and clean edges
Graphite is often too grey and shiny for Op Art. For the maximum vibrating effect, you need deep, matte black ink. Use a fine liner for the edges and a thicker marker to fill the squares.
Messy edges ruin the vibration. The brain needs sharp transitions between black and white to get ‘confused’ and create the motion signal. Use a steady hand or French curves to ink your wavy lines.
Step 5: Using color theory for vibrating boundaries
While black and white is classic, you can use clashing colors to enhance the vibration. Red and cyan, or orange and blue, are high-contrast pairs that tire the eye receptors, creating a shimmer.
Apply these colors to the boundaries of your shapes. This technique creates a ‘visual buzz’, a hallmark of psychedelic and visual perception art.
Digital Shortcut: Using ‘Liquify’ tools on checkered patterns
If you are working digitally, you can achieve this in seconds. Draw a perfect standard checkerboard. Then, use the ‘Liquify’ or ‘Warp’ tool in Procreate or Photoshop.
Drag your stylus through the grid to push and pull the pixels. The checkerboard will stretch and compress fluidly. This is the fastest way to create complex digital illusion art without manually plotting every curve.
Tutorial 4: The Levitating Cube
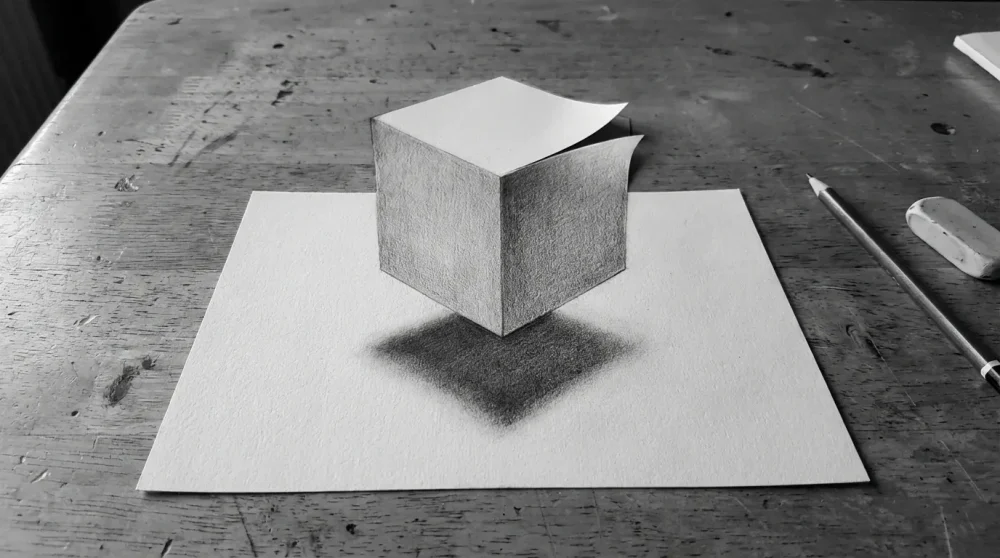
Making an object float is all about disconnecting it from its shadow. This tutorial covers a simple cube, but the principle applies to any object.
Step 1: Drawing the cube in 2-point perspective
Draw a horizon line and two vanishing points. Draw the vertical corner of your cube, then connect the top and bottom to both vanishing points. Define the back edges.
You should have a solid-looking cube. Ensure the perspective is fairly dramatic; a flat view is less convincing for a floating cube drawing.
Step 2: Determining the light source
Decide where the light is coming from. Let’s say top-right. This means the top and right faces of the cube will be light, and the left face will be in shadow.
Consistency is key. If your light source is inconsistent, the brain will reject the illusion. Mark the light direction with a small arrow on your paper if needed.
Step 3: Drawing the cast shadow (detached from object)
Here is the trick: Draw the cast shadow below the cube, leaving a distinct gap of white space between the bottom of the cube and the start of the shadow. The larger the gap, the higher the cube appears to float.
The shadow should mimic the shape of the cube but be flattened and distorted according to the perspective. This detached shadow is the primary visual cue for levitation in simple line illusions step by step.
Step 4: Softening the shadow edges (penumbra)
Real shadows are not pitch black sharp cutouts. The center of the shadow (umbra) should be dark, but the edges (penumbra) should be soft and blurry.
Use your finger or a blending stump to smudge the edges of the shadow. This softness contrasts with the sharp lines of the cube, reinforcing that the cube is a solid object while the shadow is merely a projection on the surface. This utilizes advanced shading techniques for depth.
Step 5: Cropping the paper to enhance the floating effect
Similar to the 3D hole, you can cut the paper. Cut around the top half of the cube. When you place the paper on a table, the top of the cube will extend beyond the paper’s edge, looking like it is hovering in mid-air above the desk.
This physical interaction with the environment is what elevates a sketch to a magic trick. It is a staple of easy optical illusions to draw for kids who want to impress friends.
Tutorial 5: The Impossible Trident (The Devil’s Pitchfork)
Also known as the ‘blivet’, this object has three prongs at one end and two at the other. It confuses the brain’s processing of edges versus volumes.
Step 1: Drawing three cylindrical tops
Start by drawing three ovals (ellipses) in a horizontal row at the top of your page. These represent the tops of the three prongs. Extending down from the edges of these ovals, draw short vertical lines to start the cylinders.
Ensure they are evenly spaced. These shapes establish the ‘three-pronged’ reality of the top half of the lines and distortion art piece.
Step 2: Drawing the U-shaped bottom base
Move to the bottom of the page. Instead of three endings, draw two rectangular U-shapes. These represent a rectangular frame. The brain now expects a rectangular structure.
The conflict arises because you have three cylinders at the top and two rectangular spaces at the bottom. The middle cylinder needs to somehow vanish or transform.
Step 3: Connecting the lines (The Confusion Zone)
This is the tricky part. Extend the lines from the top cylinders down. The outer lines of the left and right cylinders connect to the outer lines of the bottom U-shape. However, the inner lines of the cylinders become the empty space in the bottom section.
You are essentially turning a positive space (a solid cylinder) into negative space (the gap between bars). Do not close the shapes too early; let the lines run long and smooth. This ambiguity is the heart of visual paradox sketch creation.
Step 4: Shading to reinforce the cylindrical vs. rectangular duality
Shade the top cylinders to look round (gradient from dark edge to light center). However, as you go down, flatten the shading to look like flat rectangular bars.
This conflicting shading clues the brain into two different geometries simultaneously. This is a classic example of how to draw impossible objects instructions that rely on conflicting local cues.
Variations: The impossible shelf and box
Once you master the trident, you can apply this logic to other shapes. The ‘impossible box’ uses the same principle of edges becoming spaces. The ‘impossible shelf’ looks like you can place an object on it, but the layers intersect physically impossibly.
These variations are excellent practice for understanding isometric drawing grid manipulation and breaking the rules of geometry.
Advanced Digital Techniques for 2026
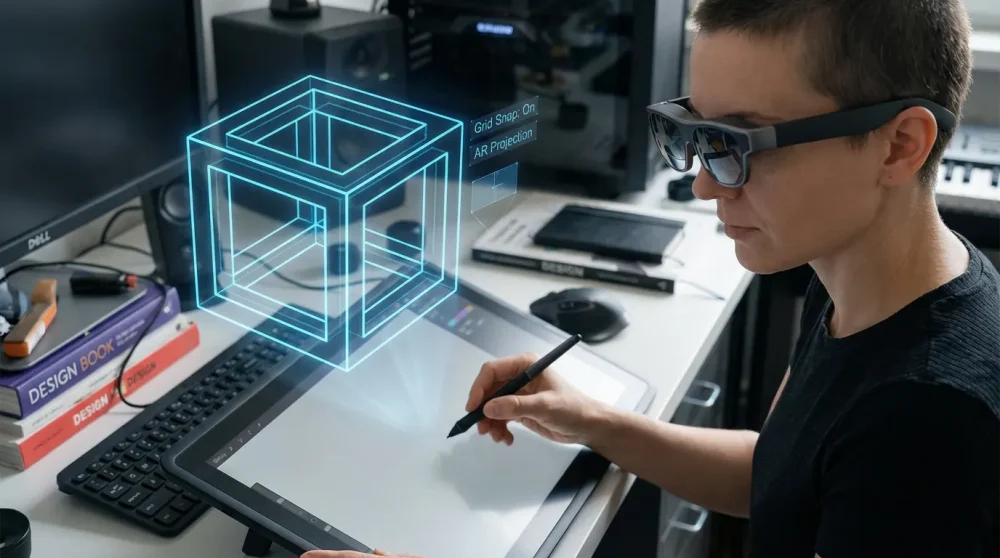
In 2026, technology has given artists new superpowers. We are no longer limited to static paper.
Using 3D model overlays in drawing apps
Apps now allow you to import rough 3D models directly onto your canvas. You can rotate an impossible shape model to find the perfect angle, lower the opacity, and trace over it. This guarantees perfect perspective every time.
This workflow bridges the gap between 3D modeling and 2D illustration, making complex digital illusion art accessible to everyone.
Creating perfect isometric grids instantly
Gone are the days of manually measuring 30-degree angles. Modern software generates infinite isometric grids with a single tap. You can toggle ‘Assisted Drawing’ on, which forces your stylus to only draw on the 30, 90, and 150-degree axes.
This feature makes drawing the isometric drawing grid for castles or Penrose steps instantaneous and mathematically perfect.
Layer masks for non-destructive impossible shape editing
When drawing overlaps in impossible shapes, you often need to erase lines. In digital art, use Layer Masks instead of the eraser. This allows you to ‘hide’ a line rather than delete it.
If you realize later that the overlap was wrong, you can simply unhide the line. This non-destructive workflow is essential for complex trompe l’oeil techniques.
Animating your illusion: Simple frame-by-frame shifts
Why stop at a still image? In 2026, animating illusions is a massive trend. By slightly shifting the angle of your grid every frame, you can make an impossible triangle appear to rotate eternally.
Simple GIF animations of op art patterns for beginners can create hypnotic, viral content that static drawings cannot match.
AR Visualization: Previewing anamorphic art on floors
Augmented Reality (AR) glasses and phone apps now let you project your drawing onto a real floor before you start. You can see exactly how the anamorphic distortion will look from the doorway.
This allows you to trace the projected image directly onto the pavement or paper, ensuring your anamorphic art tutorial projects are perfect without complex math.
Frequently Asked Questions
How do I draw a 3D hole in paper step by step?
To draw a 3D hole, first draw a distorted ellipse to represent the opening. Then, draw vertical lines descending from the edges of the ellipse. Add details like a ladder with rungs that get closer together as they go down. Finally, shade the bottom of the hole pitch black and fade to grey as you move up. Cut the top edge of the paper for the full effect. This is one of the most popular how to draw a 3d hole in paper easy step by step requests we receive.
What are the easiest optical illusions for beginners to draw?
The easiest illusions to start with are the Impossible Triangle (Penrose Triangle), the Impossible Trident (Devil’s Pitchfork), and simple Op Art checkerboards. These require only a ruler and basic understanding of lines, making them perfect easy optical illusions to draw for kids and beginners.
How to draw an impossible triangle (Penrose triangle)?
Start with an equilateral triangle. Draw a smaller triangle inside it, and a third smaller one inside that. Connect the corners with V-shapes, ensuring the lines overlap in a cyclic pattern (top over right, right over left, left over top). Erase the guide lines and shade the three different faces with contrasting values. This penrose triangle drawing is the standard starting point for illusionists.
What tools do I need for 3D anamorphic drawing in 2026?
You need a smooth Bristol paper, a range of graphite pencils (2H to 8B), a clear ruler, and a camera (smartphone). For digital artists, a tablet with an app like Procreate or Adobe Fresco is standard. New 2026 AR tools can also help project grids onto your drawing surface for perfect anamorphic art tutorial execution.
How does one point perspective work in optical illusions?
One-point perspective uses a single vanishing point where all receding lines meet. In optical illusions, this is often used to create infinite tunnels or deep pits. By manipulating the spacing of transverse lines as they approach the vanishing point, you create a powerful sense of depth, essential for vanishing point perspective illusions.
Can I create optical illusions using digital drawing apps like Procreate?
Absolutely. Digital apps are superior for creating perfect grids and clean lines. Tools like ‘Drawing Assist’ in Procreate lock your lines to an isometric or perspective grid, making it much easier to draw digital art optical illusion tutorial procreate style pieces without manual measurement errors.
How to shade drawings to make them pop off the page?
The key is high contrast. Use a light source to define a cast shadow that is detached from the object to imply floating. Use dark gradients (ambient occlusion) where objects touch the ground or each other. Soften the edges of shadows (penumbra) to make them look realistic. Mastering shading techniques for depth is what transforms a flat sketch into a 3D illusion.